

| Back to Table of Contents Catalogue Managment Overview If you have opted to use an online catalogue clicking the links in fig 1.0 (  ) will take you to the section desired. Adding
items to your catalogue involves adding Areas (first level of navigation) and Sub-Areas (second level of navigation). These are assigned to Areas
and Products are assigned to a Sub-Area(listed when a Sub-Area is clicked on). Also if you are selling to both US and CAN customers you may set
up an Exchange Rate. If opted for, a shopping cart allows for customers to email you a list of products they wish to purchase with their contact
information. Also your site can link into 3rd party payment processors suchs as PayPal so your customers can buy right from your site. ) will take you to the section desired. Adding
items to your catalogue involves adding Areas (first level of navigation) and Sub-Areas (second level of navigation). These are assigned to Areas
and Products are assigned to a Sub-Area(listed when a Sub-Area is clicked on). Also if you are selling to both US and CAN customers you may set
up an Exchange Rate. If opted for, a shopping cart allows for customers to email you a list of products they wish to purchase with their contact
information. Also your site can link into 3rd party payment processors suchs as PayPal so your customers can buy right from your site.Display Options Click the Display Options link will allow you to change the layout of your catalogue how it appears on your website (fig 4.0). You can displayas a List  )) )) )) )) )) ))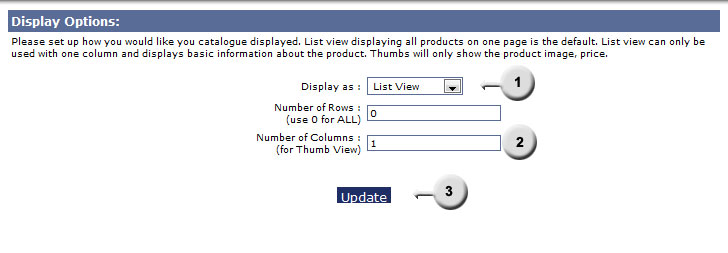 fig 4.0 Areas 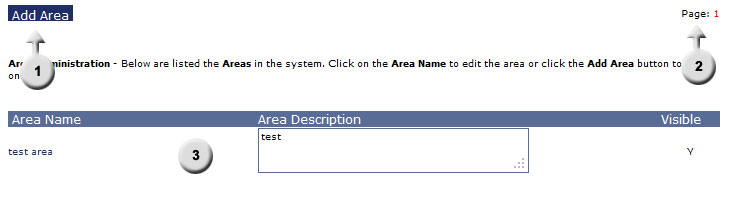 fig 4.1 Clicking the View/Edit Area link from the tools page (fig 1.0 ( )) brings you to the Areas page (fig 4.1). Areas are the first level of
navigation in your catalogue and appear in the main menu of your website. You may add an Area by clicking the 'Add' button )))) and can be paged through using the navigation controls (fig 4.1 ()). Areas are edited or deleted by clicking on the Area Name. Visibile indicates whether the Area is visible on the site.Add Area  fig 4.2 In order to add an Area click the 'Add' button (fig 4.1 ( )). This will open a new window as shown in fig 4.2. Fill in the Area Name in section
. This is the name that will appear in the main menu of your catalogue. The description box is not mandatory but if completed it will be displayed
at the top of the Area page. indicates where the area is visible on the website or not. Click the 'Add' button in  to add the Area. to add the Area.Editing/Deleting An Area  fig 4.3 In order to edit your Area change the information in sections , & in fig 4.3 and click the 'Update' button . If you want to delete
the Area click the 'Delete' button . You will be asked to confirm the deletion. NOTE: Deleting an Area may orphan Sub-Areas and make some Products unavailable in your catalogue.
Please be sure to re-assign any orphaned Sub-Areas. The 'Back' button will take you back to the Areas main page.Sub-Areas  fig 4.4 Clicking the View/Edit Sub-Area link from the tools page (fig 1.0 ( )) brings you to the Sub-Areas page (fig 4.4). Sub-Areas are the second level of
navigation in your catalogue and appear as popouts from the Area they are assigned to. You may add a Sub-Area by clicking the 'Add' button (fig 4.4 ()). Sub-Areas are listed
in groups of ten (fig 4.4 ()) and can be paged through using the navigation controls (fig 4.4 ()). Sub-Areas can be edited or deleted by clicking on the Sub-Area Name. Visibile indicates whether the Sub-Area is visible on the site.Add Sub-Area  fig 4.5 In order to an add a Sub-Area click on the Add button (fig 4.4 ( )). This will open a new window as shown in fig 4.5. Fill in the Sub-Area Name . This is the name that will appear in the second level of navigation in your catalogue. The description is not mandatory but if filled out will be displayed
at the top of that Sub-Area page. A Sub-Area must be assigned to an Area and whether or not it's visible on the site . The 'Add SubArea' button is pressed to save.Editing/Deleting A Sub-Area  fig 4.6 In order to edit your Sub-Area change the information in sections ,, &  in fig 4.6. All Sub-Areas must be assigned to an Area
. Click the Update button to save your changes. If you want to delete
the Sub-Area click the 'Delete' button . You will be asked to confirm the deletion. NOTE: Deleting a Sub-Area may orphan products and make them unavailable in your catalogue.
Please be sure to re-assign any orphaned Products. The Back button will take you back to the Sub-Areas main page. in fig 4.6. All Sub-Areas must be assigned to an Area
. Click the Update button to save your changes. If you want to delete
the Sub-Area click the 'Delete' button . You will be asked to confirm the deletion. NOTE: Deleting a Sub-Area may orphan products and make them unavailable in your catalogue.
Please be sure to re-assign any orphaned Products. The Back button will take you back to the Sub-Areas main page.Products  fig 4.7 Clicking the View/Edit Products link from the tools page (fig 1.0 ( )) brings you to the Products page (fig 4.7). These are the actual items
in your catalogue. You may add a Product by clicking the 'Add' button (fig 4.7 ()) this is also where you may filter the products displayed. Products are listed
in groups of ten (fig 4.7 ()) and can be paged through by clicking the page numbers (fig 4.7 ()). Products can be edited or deleted by clicking on the Product Name.
You may also apply global price changes to a Sub-Area of products by clicking the 'GPC' button .Add Product  fig 4.8 In order to add a Product click on the 'Add' button (fig 4.7 ( )). This will open a new window as shown in fig 4.8. The only required fields
are located in fig 4.8 (). These are: Product Name, Sub-Area assigned to and a Product ID (which can be numbers or letters).
From the Products Tool page (fig 4.7) click a Product Name to Edit/Delete it. The Edit page is the same layout as the Add page (fig 4.8) except at the top where you may click 'Update' to save changes to a product, 'Delete' to remove a product (you will be prompted for confirmation) or 'Back' to go back to the Product Tools page. All the requirements and details on this page are the same as in the Add Product section. Global Price change  fig 4.9 If you have a large number of products under a certain Sub-Area you may wish to make price changes to them simultaneously rather then individually. This can be accomplished by clicking the GPC button (fig 4.7( )) on the Products Tool page. This will bring up a new window as shown in fig 4.9. First select the Sub-Area
you want to apply the changes to . Then enter the amount of the change .
Next select whether this is to be applied as a multiplier or base change . A multiplier will convert the number to a percentage (i.e. 50 = 50%) and multiply the prices by that
percentage (i.e. $20.00 x 50% = $10.00). A base change takes the amount in and adds it to the price (i.e. $20.00 + 2.00= $22.00). Click the 'Effect Change' button
to complete the changes.Product Forms  fig 4.10 Some products you may wish to add addtional forms for customers to fill out when purchasing your products such as colour selection that does not affect the price of the product. Fig 4-10 shows a list of product forms in the system (NOTE: Product forms are not the same as site forms. Product forms display with a product while site forms display on a webpage and are in a different section.). Clicking the button in area will allow you
to create new forms. allows you to page through your product forms. By clicking on the Form Name in you may edit or delete the form.Adding A Form 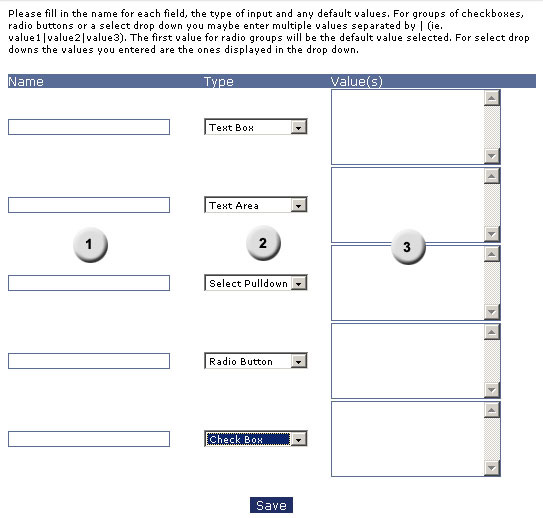 fig 4.11 When first adding a form your will be asked to provide a name for the form so you can reference it when adding it to your products. Next you will be asked for the number of fields the form will contain. A field is an area where the customer may type or select their input (NOTE: A group of radio buttons or check boxes are considered one field. ie. if you had a Size option with 3 radio buttons asking for sm, md, lg the sizes would be treated as on field 'Size' even though there will be 3 buttons displayed). You are then taken to fig 4.11 . Enter the name of the field in and then select what type of input it is in . In
you may add default values for text boxes/areas (if required) and the values for your drop downs, radio and check box inputs. These values for the last 3 are separated by the '|' character which is a shifted backslash (above the enter key). So from our previous Size
example the values would be placed in like sm|md|lg. Clicking the save button at the bottom of the screen will save the form to the system.Editing/Deleting Forms  fig 4.12 allows you to return to the View Forms page, Update your changes, Delete a form or View how it will be displayed. allows you to add
more fields to your form. The page will refresh with the new fields displayed at the bottom. If you will to remove a field from your form simply blank out (make sure no spaces are present either) the Name in .Exchange Rate  fig 4.13 If you are targeting an international client base you may want to use an exchange rate between US and CAN funds. This is done by clicking the Activate Exchange link shown on fig 1.0 ( ) (if you have already activated exchange rates this will change to Edit). This will take you to the Exchange Rate page as shown in fig 4.10. In section enter the exchange
rate. In section choose your base currency to apply the exchange rate to. Click the 'Submit' button to save the changes or if you wish to stop using exchange rates then click the link
in section .Shipping  fig 4.14 If you are using PayPal so your customer may shop online then you may want to set up a basic shipping table. You select the State/Province in and then set a factor in .
This factor is multiplied by the total weight of your order and sent to PayPal as an item which is adding on to total of your purchase.Back to Table of Contents |
 ): You may mark a product as a special. Specials are shown when your catalogue is entered and are randomly chosen from the products you have marked as special.
 ): Once you've filled out your product information click the 'Add' button.